March 4, 2023
Smartphone cameras are no longer just a convenient memory saver, but a powerful device that can create quality replicas of real life when used properly.
Samsung released one of the first camera phones in 2000 and Apple’s first phone featured a small camera in 2007. Now in 2023, these companies are the biggest smartphone competitors by a large margin who drop annual releases to consistently improve their camera capabilities, appealing to photographers and casual picture takers. Accessibility to photography has never been greater, and the skill gap between good and great photographers is shrinking. Here are a couple of tips to understand and manipulate your smartphone’s camera and photos.
Rule of thirds
The rule of thirds is a guideline photographers and painters alike keep in their toolbox that places the subject in either the upper, lower, or side third of a photo. The first mention of this idea was written by an English painter and antiquarian named John Thomas Smith in Remarks on Rural Scenery when he said,
“Whether of light, shade, form, or color, I have found the ratio of about two thirds to one third, or of one to two, a much better and more harmonizing proportion, than the precise formal half, the too-far-extending four-fifths—and, in short, than any other proportion whatever.”
The key is to place a similar color or subject in the other two thirds so the focus draws the viewer’s eye first. Most smartphones have an option to overlay a 9-box grid over the phone’s camera, so taking a few extra seconds to align your subject with one of the thirds can help draw focus where you want it to be. Taking multiple shots with your subject along different lines, highlights different attributes of the scene.
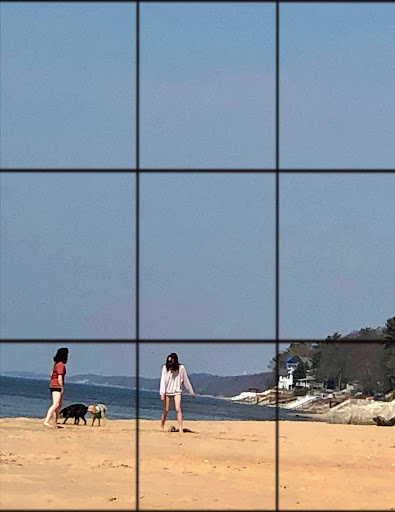
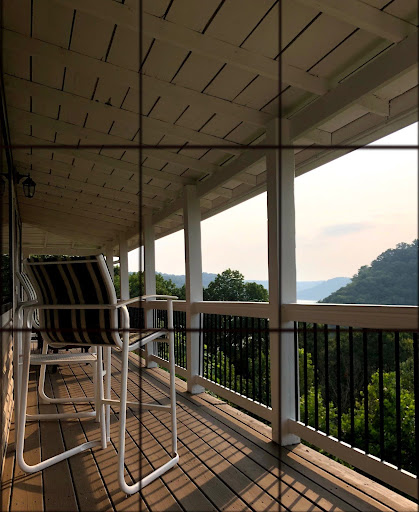
The first photo is contrasting our subjects with the vastness of the beach by only placing the sky in the upper two thirds. The second photo is giving the chair “looking space” by placing it towards the view in the left third.
Turn phone upside down
Smartphone cameras are located at the top of the phone, so turning the entire smartphone upside down opens new angles to take photos from. When we hold our phones upright, the angle will typically be straight on or downcast, while turning the phone 180 degrees will have a heavier upper angle. Newer smartphones automatically rotate the picture in the gallery so it appears right side up.

This effect can be used when the subject is in the center of the photo. It is also effective in capturing more of a tall subject that would run out of frame otherwise.
Don’t be afraid to edit a little!
While smartphone cameras are complex, users cannot manually manipulate the lens to capture exactly what our eyes see, so post editing can play a subtle but important role. A shot can be executed flawlessly but the colors may appear washed out or not enough light was let in. These are a couple of key features found in most hardware’s editing tools.
Highlights are the lightest colors of the photo, so increasing highlights will lighten colors while decreasing it will deepen colors.
Brilliance, exposure and shadows deal with adding more light or darkening a photo. Exposure affects the entire photo equally, brilliance focuses on the highlights of a photo and shadows target the darkest colors of the photo.
Definition and sharpening are similar tools but perform different functions. Sharpening outlines cleaner edges on blurry images while defining removes haze by increasing color saturation and lighting.


Much of editing is up to personal preference. For this appearance change, brilliance, shadows, saturation, definition and warmth were increased and highlights decreased.
Lock in focus and exposure
Tapping the area over the subject will make a colored box appear around it and focus on it. This readjusts the camera’s depth of field to account for how far away the subject is placed. Once the box has appeared, simply slide vertically on the side with the sun icon to let in more light or block some out. This is opening and closing the camera’s aperture, similar to how the pupils in eye’s expand in the dark and close up in the light.

Turn on Live/ Motion Camera
Introduced in 2015 by Apple and 2016 by Samsung, live and motion cameras record 1.5 seconds before and after a photo is taken and saves a 3 second video with audio and photo. At 15 frames per second the video can appear choppy if a lot of motion crosses through the frame, but the sound is consistent throughout. More important to photo saving, an additional 44 individual frames from the video have been saved to choose from. It is similar to a burst, holding down the shutter button to continuously capture images, however frames are more likely to be blurry or have lower definition. This is a helpful tool when the subject is close and making small movements, or a lot of motion is occurring far away.


All 3 stills were taken from the same photo by selecting a different frame and saving the photo.
